Check Out My Review
If you aren’t familiar with the game already, or would like to see my thoughts on the game, please check out my full in-depth review of Super Dungeon Maker below!
Originally I placed the below breakdown of the dungeon designer within my review itself. However, it made the review feel a little bloated and I realized that not everyone would want a full peak behind the curtain before trying the game out for themselves.
Super Dungeon Maker – Game Review
Super Dungeon Maker is a wonderfully cozy, creative, and nostalgically fun 2D dungeon designing game developed by Firechicks, a team of two talented developers with a passion for gameplay and creativity inspired by the Legend of Zelda.
For those that are interested, here’s a deeper dive into how to use the dungeon designer feature of Super Dungeon Maker!
Using the Dungeon Designer
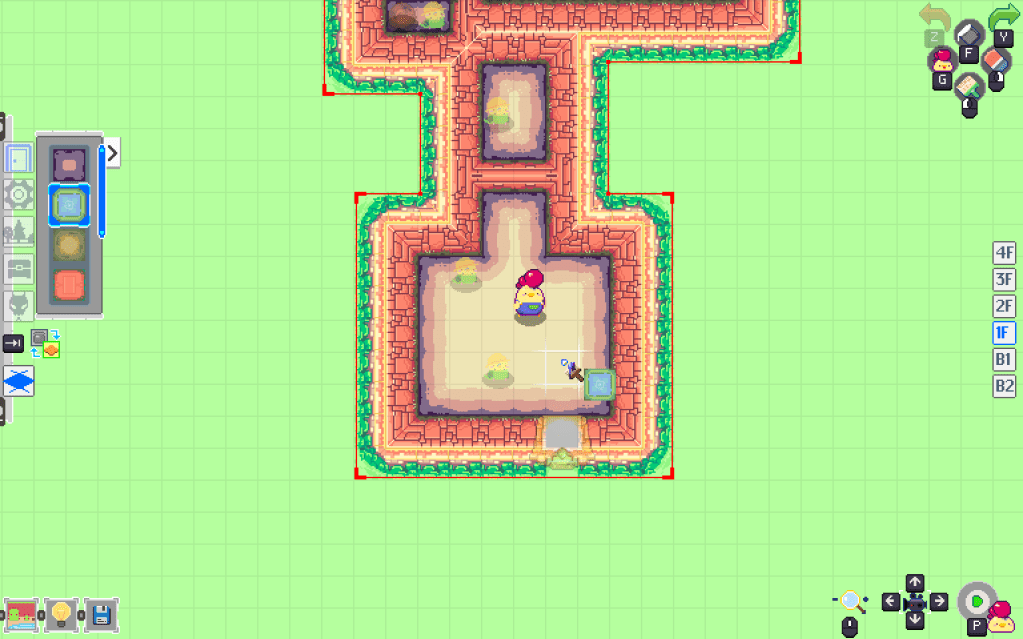
Once you’ve decided to create your own dungeon, you’ll need to know how to navigate around the User Interface (UI). From inside the dungeon designer, you’ll be able to select different editing options. The designer is comprised of two made ‘modes’. First is the Paint mode where you control the floors and walls of the dungeon. Then there’s the Build mode itself where you place Doors, Puzzle Elements, Decor, Treasure, and Enemies. In both modes, the UI is essentially the same except for the contextual buttons in the top right hand corner, which I’ll cover in their respective sections below.
Overall UI
The following is based off the Steam version but the UI on the Nintendo Switch has the same layout, just mapped to different buttons. Going in clockwise order around the edge of the screen, I’ll go over the different options.
- Undo/Redo: Start at the top right of the screen there is a Red arrow and Green arrow that show you the buttons to use in order to Undo (Red Arrow) or Redo (Green Arrow) changes you’ve made in the dungeon.
- Contextual Buttons: There are four buttons here that do various things depending on your mode. The left button will always place Fink at the location of your cursor no matter what mode you’re in. The other three buttons are contextual depending on if you’re in Paint or Build mode (see below).
- Floors: The column of icons on the middle-right of the screen denote floor numbers where you can select which floor of the dungeon you’re currently editing. On any given floor, placing a set of upstairs or downstairs (see Doors below) automatically places a corresponding set of stairs connected to a small room either in the floor above or below, depending on which set of stairs you selected.
- Build/Play Mode: There’s a little green Pause or Play button in the bottom right corner next to an icon of Fink’s face that switches Fink between Build and Play modes respectively.
- Camera: The camera icon surrounded by different directional options just shows you which buttons to press to move the overhead camera around to different parts of your dungeon.
- Zoom: The magnifying glass shows you which button to use to zoom your view in and out.
- Save: Save your current progress on your dungeon.
- Lighting: Change the overall brightness of your entire dungeon which makes light sources like torches stand out more or have a more dramatic effect.
- Theme: There are currently 4 dungeon themes to choose from that change the visual pallets of everything in both the Paint and Build modes as well as the overall dungeon music. Devs hav confirmed more themes are coming soon.
- Paint/Build Mode: The column of icons on the middle-left of the screen toggle between the various options in the Paint and Build modes (see below).
Paint Mode
At the bottom of the Paint/Build column of icons there’s an icon that looks a bit like a diamond shaped dungeon tile. Selecting this puts the editor into the Paint mode. From here you can select a variety of visually different dungeon tiles as well as a few mechanically different tiles such as water tiles, etc. You can mix and match any combination of these tiles options in any room. The tile you paint with the floor option also automatically builds your walls around that that tile or group of tiles. This allows you to create a particular room in any shape or size you want. Each room has it’s own colored outline letting you know which rooms are separate from each other. This effects monsters and doors but mostly effects the programming aspect of the builder (see No Code Programming below)
This mode also changes the Contextual Buttons in the top right corner of the screen which do the following:
- Top Button: This fills an entire room with your chosen floor paint.
- Right Button: Using the denoted button allows you to erase floor tiles.
- Bottom Button: Using the denoted button allows you to paint tiles based off the paint selection you’ve made.
Build Mode
Finally we get to the largest section of the dungeon designer, the Build Mode itself. When in this mode, you have a column of icons that allow you to place different categories of objects into your dungeon (from top to bottom of the column):
- Doors – place doors between two separate rooms. You can choose between open doors, locked doors that require a key, stairs to go to different levels, bombable walls, or doors that only open from certain triggers.
- Puzzle Elements – place various interactable objects that produce with various effects. This includes (but not limited to) moveable or bombable objects, switches that activate varies programmable effects (see No Code Programming below), and spawners/despawners that can create or remove various objects/enemies respectively.
- Decorations – place visual items all over your dungeon, many of which can be spawned or despawned with the above puzzle elements.
- Treasure – place treasure chests, keys, or various treasures (special items like bombs or hookshots, dungeon map or health restoring hearts). These items can be hidden in chests, cuttable grass, or breakable pots.
- Enemies – fill your dungeon with a small selection of unique enemies or bosses that have their actions and strategies for defeating.
This mode also changes the Contextual Buttons in the top right corner of the screen as well which do the following:
- Top Button: Unused in this mode.
- Right Button: Using the denoted button allows you to erase specific objects placed in the dungeon.
- Bottom Button: Using the denoted button allows you to drag and drop placed objects around in your dungeon. This is mostly helpful for placing Treasure inside chests or moving around Decorations.
Sample Puzzle
Once you combine elements from all of the above tools, you can create rooms like this!!
No Code Programming
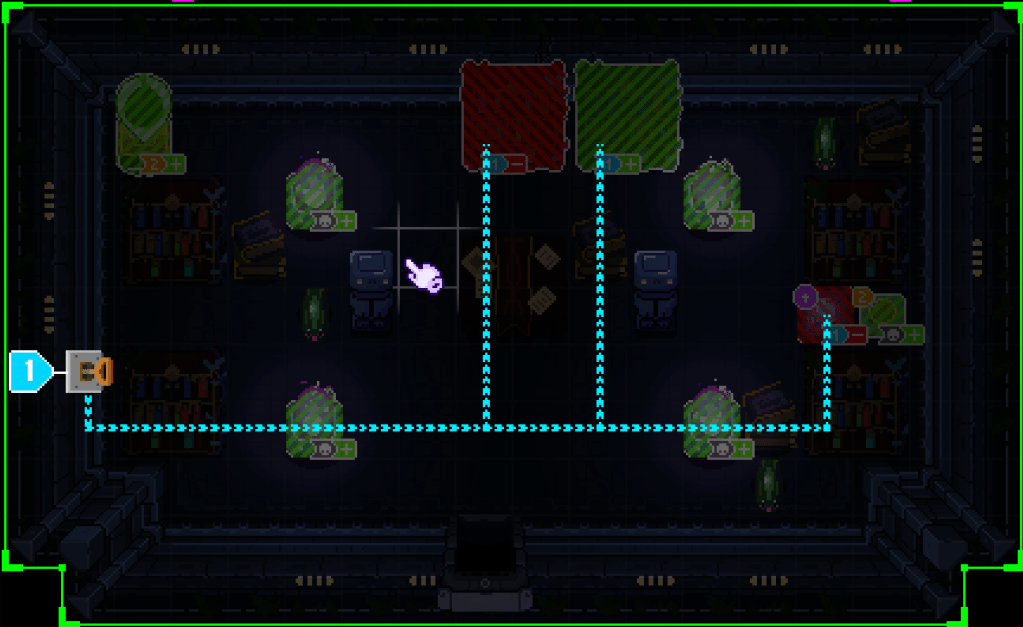
As you can see from the video above, beyond the various dungeon design tools lies an impressive no-code programming tool that allows you to let your creative puzzle-making imagination run wild in your dungeon. You don’t need any programming knowledge to create these complex effects and it’s so fun to set them up and watch them play out. You simply connect Decor and Puzzle Elements together via various, what the developer calls, Channels. Each room has its own set of 10 self-contained program ‘channels’ and each one lets you combine various objects, switches, and enemies to create various effects and changes in that one room. The default channel is the ‘Enemies channel’, denoted by a little skull symbol, which kicks off any time all Enemies in that room are defeated. There are 9 additional channels labeled 1-9 that can each be hooked up to any variety of Decorations and Puzzle Elements to cause fun effects.
Lets break down how I designed the puzzles in the above video:
- Step 1: I used the Enemies Channel to make lights appear in the dark room once they have all been defeated. On the same channel, I also made a pressure switch on the right hand side come into existence via a spawner, effectively making it appear as if the light illuminated a previously unseen switch. However this pressure switch is trapped behind an unmovable block.
- Step 2: I wanted to create a hidden entrance that was only visible once a bookshelf was ‘moved’ by activating a switch. But I wanted the switch to have a timed effect I used the Puzzle Element of a pull switch that can be placed on a wall and interacted with by pulling the rope out away from the wall activating various effects. The neat trick about this particular switch is that after pulling the rope away from the wall, it slowly begins to retreat back into the wall and once it full retracts, the connected effects end. I connected this pull switch to Channel 1 and on the same channel, I hooked up a despawner under the middle bookshelf and spawner to the right of that bookshelf to create the illusion the bookshelf is moved to the right. I also placed a despwaner under the unmovable block that was previously trapping the pressure switch, making it accessible. In the image below you can see I connected all of this on a single channel, making multiple things happenat once based off a single interaction with the pull switch, all of which only activates for a certain amount of time (depending on how far out you pull the switch) before it reverts back to its previous state.
- Step 3: I connected the pressure switch on Channel 2 which also connected to a spawner that spawns a chest filled with the bomb item. Once the player reaches the pressure switch, they discover it not only reveals the chest but the chest only exists as long as there is constant pressure on the pressure switch. This can be remedied by pushing a nearby statue onto the pressure switch which can only happen while the block in front of the pressure switch has been despawned from the pull switch. Once the player figures out how to time the use of the pull switch with moving the statue and bombing the wall behind the bookshelf, they gain entrance into the next room containing more treasure!
Once all the elements are hooked up and in place, it creates a fun experience for both the designer (me) and hopefully the player (which for the time being was also me, but it was still a rewarding experience to see it all working together). And this is just a small example of what can be done in a single room using a small number of items connected to just 3 of the 10 program channels available to that room. You can create any number of rooms on a single floor of a dungeon, with their own separate set of 10 channels each, and then you can have up to six floors in a single dungeon leading to some truly impressive dungeons! It’s this foundational framework of building and programming that’s so easy to use and so versatile that I feel the developers have made something truly special!
Dungeons Aren’t Just for Videogames
This section is also in my review but I feel it bears repeating for anyone that’s reading this article and hasn’t read the review.
One of the things I’m most excited for is how Super Dungeon Maker can be a great tool for aspiring TTRPG dungeon designers. I think the skills of designing levels filled with puzzles, traps, treasures, and enemies are fully transferable to creating those same engaging elements in a TTRPG dungeon. While Super Dungeon Maker has a fairly limited number of enemy types, when compared to the number of creatures in the Monster Manual, the other aspects are always hard to design and implement in a new TTRPG map, especially when working from scratch. When I first started designing my own 5e dungeons, most of my dungeons were filled with simple square or rectangular rooms focused mostly on combat. Figuring out how to make engaging maps with interactive puzzles, challenging traps, and various combinations of locked or unlocked doors, was all very overwhelming. Even now that I’ve made my fair share of fully custom TTRPG maps, I still find it difficult to know how to string these various elements together. I’ve now tested designing levels in Super Dungeon Maker, with TTRPG maps in mind and I’ve found it to be extremely helpful in streamlining the creation process as the framework helps you know how to combine these elements effectively. You can look forward to a deeper dive into how TTRPG creators can translate the elements inside Super Dungeon Maker over to their own TTRPG maps.
Conclusion
All in all, I’ve fallen in love with Super Dungeon Maker which has an incredibly impressive framework for creating your own custom dungeon. I can’t wait to continue to watch the community and the game itself grow. The game officially released their v1.0 on March 3rd, 2023 and to celebrate they are offering 20% off on both Steam and Nintendo Switch for a limited time! If you haven’t already, join the official Super Dungeon Maker Discord here!
Have a Game or Tool that needs a How-to?
If you have a tool, program, game, or indie project (including TTRPGs, board games, video games, books, etc.) that you would like to have a detailed tutorial made like this one, reach out to us today at QuillsNQuests@gmail.com!

Leave a comment